Followup to earlier post. I found some errors eventually, and have I think improved it some.
I have a bit of a fetish for “lossless editing”
So, I use adjustment layers a lot, and adjustment layers with layer masks (which, I say again, are dodging and burning died and gone to heaven!), and then do a lot of pixel fixing writing onto a separate layer.
But there are a few tools, or a few situations maybe, when that’s not the best option. Keeping an entire clean copy of the base layer meets my criteria, but it kind of doubles the file size (layers that are mostly transparent compress pretty well, so my multi-layer files are mostly not that much larger than the base).
So, here’s what I do:
- Duplicate the base layer (shortcut: CTRL-j). My process expects the mode of this layer to be “normal”.
- Select this new layer
- Do the editing that has to be done in the context of all the pixels
- Usually, I keep this for a while, until I’ve printed or put the picture on the web or whatever the plan was
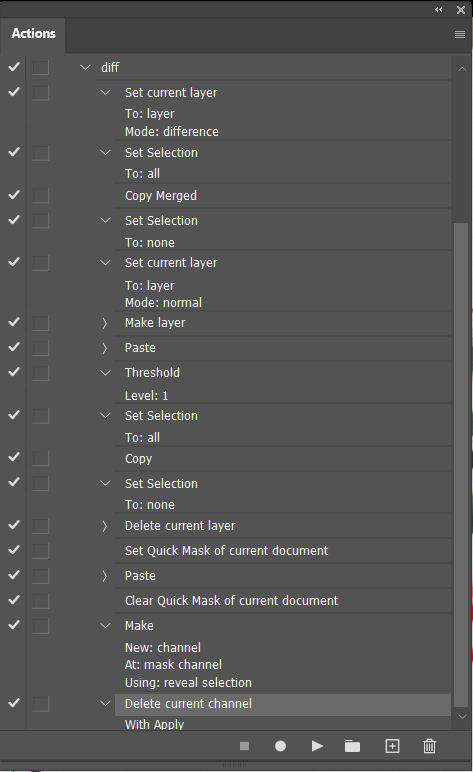
- Select your edit layer, and run my magic diff script. This deletes every pixel in the edit layer which is the same as is rendered by the stack of layers under it.
So, how does this version of the diff script work? I’m glad you asked!

- Set mode of edit layer to “difference”. This shows the differences between the current layer and the stack under it.
- Select all
- Copy Merged. This copies the full detailed differences.
- Select none
- Set mode of edit back to “normal” on this layer
- Create new pixel layer
- Paste (puts the differences here)
- Threshold, level=1. This reduces the difference map to black-and-white, with every unchanged pixel black and every changed pixel white.
- Select all
- Copy
- Delete layer (same one we created above, that was scratch workspace)
- (We are now on the original edit layer again)
- Set quick mask mode
- Paste
- Exit quick mask mode. The B&W change mask we made is now a selection.
- Add layer mask. The current selection will be put in as that mask. So now we have the edit layer, with a layer mask selecting only the changed pixels on this layer.
- Apply layer mask. This deletes all the pixels blocked by the layer mask, and then deletes the layer mask itself. Thus making this layer take a lot fewer bits to store!