Photoshop DIFF Action

Followup to earlier post. I found some errors eventually, and have I think improved it some.

I have a bit of a fetish for “lossless editing”—working on a photo in such a way that I don’t change the initial set of bits that I imported. I think as you get more experienced it becomes less important; being sure you’ve got something the way you want it means you don’t care whether it’s easy to change later. But, for me, I edit incrementally, taking a while to see the flaws in older edits (especially when I’m editing a bunch of photos that will be displayed together), so it’s very useful to be able to very easily change my mind about things I’ve already done.

So, I use adjustment layers a lot, and adjustment layers with layer masks (which, I say again, are dodging and burning died and gone to heaven!), and then do a lot of pixel fixing writing onto a separate layer.

But there are a few tools, or a few situations maybe, when that’s not the best option. Keeping an entire clean copy of the base layer meets my criteria, but it kind of doubles the file size (layers that are mostly transparent compress pretty well, so my multi-layer files are mostly not that much larger than the base).

So, here’s what I do:

  1. Duplicate the base layer (shortcut: CTRL-j). My process expects the mode of this layer to be “normal”.
  2. Select this new layer
  3. Do the editing that has to be done in the context of all the pixels
  4. Usually, I keep this for a while, until I’ve printed or put the picture on the web or whatever the plan was
  5. Select your edit layer, and run my magic diff script. This deletes every pixel in the edit layer which is the same as is rendered by the stack of layers under it.

So, how does this version of the diff script work? I’m glad you asked!

Listing of diff action
The DIFF Action
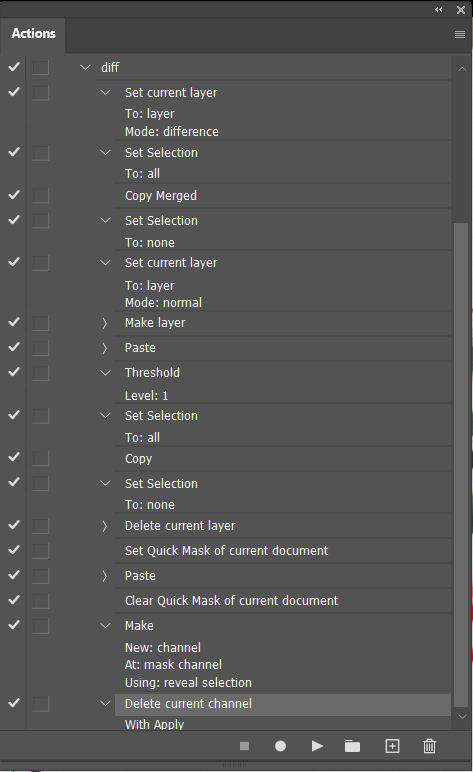
  1. Set mode of edit layer to “difference”. This shows the differences between the current layer and the stack under it.
  2. Select all
  3. Copy Merged. This copies the full detailed differences.
  4. Select none
  5. Set mode of edit back to “normal” on this layer
  6. Create new pixel layer
  7. Paste (puts the differences here)
  8. Threshold, level=1. This reduces the difference map to black-and-white, with every unchanged pixel black and every changed pixel white.
  9. Select all
  10. Copy
  11. Delete layer (same one we created above, that was scratch workspace)
  12. (We are now on the original edit layer again)
  13. Set quick mask mode
  14. Paste
  15. Exit quick mask mode. The B&W change mask we made is now a selection.
  16. Add layer mask. The current selection will be put in as that mask. So now we have the edit layer, with a layer mask selecting only the changed pixels on this layer.
  17. Apply layer mask. This deletes all the pixels blocked by the layer mask, and then deletes the layer mask itself. Thus making this layer take a lot fewer bits to store!

Need Photoshop “Difference” Plugin

I want to make an image layer that consists of all the parts of a second layer that differs from a third layer.  That is, for each pixel, compare layer 1 and layer 2.  If they differ, put the layer 2 pixel in that position in layer 3.

I haven’t found a way to do this with the image calculation stuff yet, though I have the germ of an idea about using this to create a mask giving those pixels, and then make the layer from that.

Has anybody already done this?

Why, you ask, do I want this?  Because I’m being silly / anal, basically. There are still  a few tools that work most usefully by modifying an image layer. I’d like to be able to make a background copy layer, do some work with those tools, then automatically create a layer containing only the pixels I changed, and delete the background copy.  This makes it much easier to take a second (or fifteenth) pass at some bit of retouching without putting other work at risk, and is pleasingly consistent with the philosophy of lossless editing.

Because I’m using it on individual layers of a Photoshop image, a standalone utility (even if it understood Photoshop files) wouldn’t be very convenient; I need a plugin, or a Photoshop action.

ETA: The germ didn’t work, but another  new idea did pretty well. The key point was using threshold on the differences. I do each channel separately, apply threshold to each, and combine the resulting masks, then make a new layer via copy. The action doesn’t properly clean up after itself yet, and I haven’t tested it in the presence of existing alpha channels or other complexities. And I haven’t applied anything stronger than visual tests to its accuracy. But I’m already using it.

Using Curves

These aren’t any sort of organized presentation of the curves tool, but sometimes I feel like it might be useful to document how I work with it, and what I can accomplish. So here’s another example of “photo prep” (an annoying term, but “printing” as we used to call it is all wrong today, and “Photoshop” is of course just one product).

The exposure on this was good to begin with. Raw conversion (in ACR) didn’t do that much, just took the exposure down about 3/4 of a stop, moved the black point up, and increased brightness. That’s what the “original” of this pair is. (Mouse-over the photo to switch to the edited version; that uses Javascript, sorry.)

Breaking Wave, after RAW conversion

Curves applied

This was all one curves adjustment. The two points circled in blue expanded the range of the white water in the wave crest. The point circled in green prevented the lower tones from being pulled strongly downwards. And the point circled in violet increased the drama by darkening the shaded inside of the wave.

This photo was inspired by one by guppiecat.