Laptop Stand

I think, for once, I got this right the first time. I’ve been casually shopping laptop stands for, oh, a decade or so I guess. It became somewhat urgent when the heat issues got bad enough that they all have vents on the bottom, fans, and still get rather hot at some points.
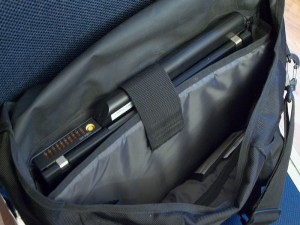
The Koolsink wraps neatly around the laptop in the bag

For me, the stand is primarily for use on the road.  I don’t use it at home that much; I’ve got a desktop system, with a comfortable chair and a big monitor, for that.  So one of the big issues is the space it took up in the bag. Also, I’d prefer one that doesn’t draw on the laptop batteries to run additional external fans (those also tend to be rather thick and hence hard to pack).
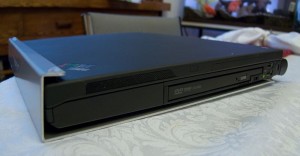
The laptop nestles inside the Koolsink

I finally found a company that had created the ideal solution to this problem—Koolsink. They make a simple aluminum sheet, bent into a narrow “J” shape (rather like a “j-card” for a CD jewel case), just the right thickness for the computer to fit inside it for storage, and to provide a little slant for use on a table. They make a number of sizes; do be sure to find the right one for your laptop!

As usual with such things, it’s a rather expensive sheet of bent aluminum. Worse, from my point of view, the shipping cost is nearly as high as the product (to the USA; they’re in Canada). And they don’t have retail dealers, they only sell direct.
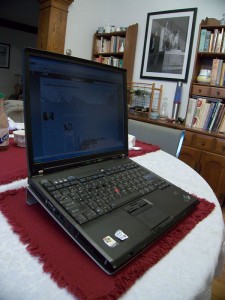
Laptop on the Koolsink on a table

I’ve now had it for a couple of weeks, though not for a road trip. It fits nicely around my computer in the bag, and works very well both on a table and in my lap to keep the vents clear and my lap cool. I would have to describe it as doing everything I hoped it would do (I admit, my hopes did not include world peace; or a pony).

Server Upgrade Chronicles V

And I think I’m going to call it a win. The new disks are in and working. I’ve even got the regular snapshot script working pretty well.

Never did quite get the two new boot disks set up with identical partition sizes, but it doesn’t matter since I attached them both to the mirror (which was limited by the size of the old 80GB disks) first, and then detached the old disks.  At that point it expanded up to the available size, which was the smallest partition on the two new drives.  They differ by a MB or two out of 160GB, not important.

Replacing A Solaris EFI Disk Label

This is kind of an adjunct to part 4 of my “Server Upgrade Chronicles”.

ZFS root pools have some requirements and best-practices at variance to other ZFS pools. One of the most annoying is that you can’t use a whole disk, and you can’t use an EFI-labeled disk. This is annoying because for most ZFS uses using a whole disk is the best practice, and when you do that ZFS puts an EFI label on that disk.

So, when you try to use in a root pool a disk you’d previously used somewhere else in ZFS, you often see this:

bash-3.2$ pfexec zpool attach rpool c4t0d0s0 c9t0d0s0
cannot attach c9t0d0s0 to c4t0d0s0: EFI labeled devices are not supported
on root pools.

What do you do then? Well, you google, of course. And you find many sites explaining how to overwrite an EFI label on a disk. And every single one of them omits several things that seem to me to be key points (and which I had to play around with a lot to get any understanding of). The fact that ZFS is what drew me back into Solaris, and that I wasn’t ever really comfortable with their disk labeling scheme to begin with, is no doubt a contributing factor.

This is going to get long, so I’m putting in a cut here. Continue reading Replacing A Solaris EFI Disk Label

Server Upgrade Chronicles IV

I got the two new system disks attached to the root ZFS pool and resilvered, so right now I’m running a 4-disk mirror for my root!  And I just booted off the #1 new disk, meaning that the Grub installation as well as the mirroring worked, and that the new controller really does support booting.

Actually, most of the excitement was earlier. In playing around with the new disks, I’d made them into a ZFS pool using the whole disk.  This put EFI labels on the disks, which Solaris / ZFS don’t support in a root pool.  So then I had to somehow get the disks relabeled and the partitions redrawn.  This turns out to be a horrible process which is not documented anywhere. The blogosphere is full of pages saying how to do it, and none of them actually tell you much.  Okay, use format -e, that’s helpful.  But they never say what device file to use, and none of the obvious ones exist.  I think you can maybe use any device pointed at the right disk for part of it. Also, I had to create an S0 manually, and I”m not sure I did it ideally (doesn’t matter much, since these disks are 4 times as big as they need to be).

I’m deeply confused by Solaris disk labeling, going back to SunOS days; even then, I thought it was absurd,  fact suicidally idiotic, to describe regions of the disk used for different filesystems which overlap. Okay, you’re not supposed to use any two that overlap for filesystems, but nothing stops you. The whole setup is just baroque, weird, stupid. And then, on x86 hardware, this Solaris idiocy takes place within one real partition (although Solaris documentation tends to call their things partitions).

So, I had to find a way to overwrite EFI labels with SMI labels. Apparently the secret is to use “format -e”. None of the pages said anything about manually creating partitions (or gave any clues for what space you could use; I believe you have to leave space at the start for the boot stuff). Anyway, totally infuriating partial documentation, and then a large group of aficionados giving slightly variant documentation with slight differences, all of it missing the key points.

Did I mention that I’m annoyed?

So I’m going to chase this for a while, until I get it actually figured out, or until I go postal; whichever comes first.

Server Upgrade Chronicles III

Very briefly, since it’s late!

I’ve temporarily given up on getting incremental send/receive working. I’m liking my results with full backups, and have some reason to believe that the next OpenSolaris release will fix the bug I’m seeing, and can’t see how to proceed on that in the short term. With a third backup drive, having just full backups isn’t so limiting, either.

I’ve got the 4x 2.5″ adapter installed in the 5.25″ bay, and the 8 port SATA controller hooked up to it, and two drives in it, and I’ve copied the system rpool to a new pool there called rp2. And am now looking at details of how to finish making that pool bootable, probably involving booting from a livecd to rename it among other things.

Weird problem with the SATA controller—the bracket on the end of the card doesn’t match the cutout in the case. I had to remove the bracket, leaving the card unsupported, which is clearly not viable in the long term with two sets of stiff cables attached to it (right now it’s supported with a bit of gaffer’s tape).

Haven’t looked into booting from the new controller, either; it’s possible I can’t, I suppose, but if so putting both boot disks on the old controller isn’t terribly painful, though it ruins my perfect plan to split every mirror pair across controllers.

There’s also a problem with the bottom left 2.5″ tray, but I’m ignoring that for now since I only need two drives in the 2.5″ bay to finish my upgrade.

Don’t know that it might not be better to install to the new drives from scratch, but there are issues duplicating the configuration down to UIDs and GIDs, which is necessary for the data pool to be accessible to the users when I import it.

Still, all the new hardware seems to be working, which is good.