The photo project that has eaten my life since June has reached completion! Or at least, has reached the point where I’m launching it publicly.
This is the same project that I was previously showing a proof gallery of in this blog.
In the final form, I’ve got 150 photos of what was written, drawn, and painted on the plywood (and OSB) panels used to protect windows in the immediate aftermath of the killing of George Floyd on 25-May-2020, and of the memorials at 38th and Chicago.
The project name has settled down to being “Words Over Windows”, and the images can be seen on the project’s web site, purchased as a book (through Amazon), or bought as individual prints (through the web site).
The Princess Bride in the rubble
Allies
Mine!
Painting Strange Fruit
A few of my favorite images
First time I’ve tried anything like this—turning a project around this fast, doing my own photo book, offering prints publicly via the web.
Of course I’d appreciate anything readers could do to spread the word about this!
That is, the Lensman series by Edward E. “Doc” Smith; the one my license plate is from.
I wrote this originally elsewhere, but it’s so long, and represents things I’ve been thinking through for decades, I decided to record it here to keep it around.
So. My thoughts on the best reading order:
You can’t win. (Also the first law of thermodynamics; but I digress.)
They were written and published in the magazines, as has been explained, as Galactic Patrol through Children of the Lens. Original publication order is nearly always a reasonable choice for anything famous—that order is how it earned its fame, so it can’t be a horrible choice.
I personally love a few things in Triplanetary all to bits (Rome and WWII), and rather dislike the actual story Triplanetary. And it’s certainly not an introduction to the real series. Plus it gives away in the first introduction all the secrets that were kept through the original 4 books, and gradually released to great effect.
First Lensman is a huge favorite of mine—largely because I love watching him back-fill all sorts of things given us in the basic 4-book series without explanation. That might be okay as a starting point also, or people might wonder why time was being spent on where weird names came from.
(Those two were assembled and published starting in 1950, when the series was first published in books, the Fantasy Press hardcovers.)
The versions of the basic 4 books have been revised to also give away the things that were kept secrets in the magazine versions—so you can’t have the experience of reading them as people really first read them, without tracking down the magazines (hint: the issues with Lensman novels in them are kind of expensive).
(And The Vortex Blaster as published in book form at least is solidly set in the Lensman universe, but is not fully compatible with it and it’s not a Lensman story. I love it all to pieces too, for its own reasons, though.)
So—my recommended approach is to read Galactic Patrol, Gray Lensman, Second Stage Lensmen, Children of the Lens, Triplanetary, and First Lensman. And The Vortex Blaster. But every possible reading order has some points against it.
Followup to earlier post. I found some errors eventually, and have I think improved it some.
I have a bit of a fetish for “lossless editing”—working on a photo in such a way that I don’t change the initial set of bits that I imported. I think as you get more experienced it becomes less important; being sure you’ve got something the way you want it means you don’t care whether it’s easy to change later. But, for me, I edit incrementally, taking a while to see the flaws in older edits (especially when I’m editing a bunch of photos that will be displayed together), so it’s very useful to be able to very easily change my mind about things I’ve already done.
So, I use adjustment layers a lot, and adjustment layers with layer masks (which, I say again, are dodging and burning died and gone to heaven!), and then do a lot of pixel fixing writing onto a separate layer.
But there are a few tools, or a few situations maybe, when that’s not the best option. Keeping an entire clean copy of the base layer meets my criteria, but it kind of doubles the file size (layers that are mostly transparent compress pretty well, so my multi-layer files are mostly not that much larger than the base).
So, here’s what I do:
Duplicate the base layer (shortcut: CTRL-j). My process expects the mode of this layer to be “normal”.
Select this new layer
Do the editing that has to be done in the context of all the pixels
Usually, I keep this for a while, until I’ve printed or put the picture on the web or whatever the plan was
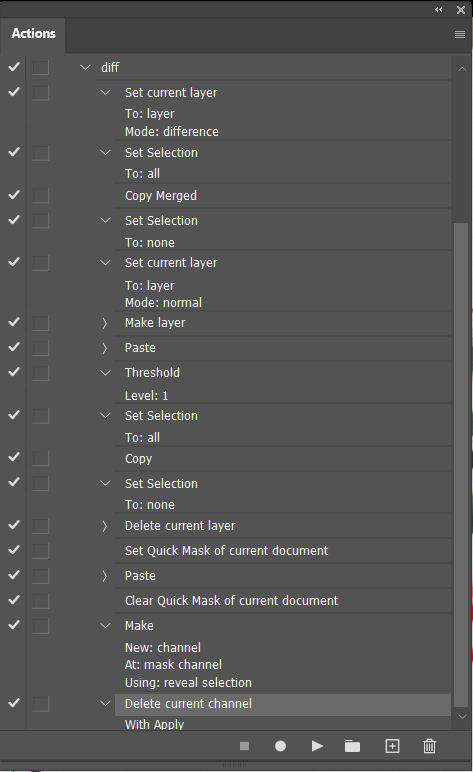
Select your edit layer, and run my magic diff script. This deletes every pixel in the edit layer which is the same as is rendered by the stack of layers under it.
So, how does this version of the diff script work? I’m glad you asked!
The DIFF Action
Set mode of edit layer to “difference”. This shows the differences between the current layer and the stack under it.
Select all
Copy Merged. This copies the full detailed differences.
Select none
Set mode of edit back to “normal” on this layer
Create new pixel layer
Paste (puts the differences here)
Threshold, level=1. This reduces the difference map to black-and-white, with every unchanged pixel black and every changed pixel white.
Select all
Copy
Delete layer (same one we created above, that was scratch workspace)
(We are now on the original edit layer again)
Set quick mask mode
Paste
Exit quick mask mode. The B&W change mask we made is now a selection.
Add layer mask. The current selection will be put in as that mask. So now we have the edit layer, with a layer mask selecting only the changed pixels on this layer.
Apply layer mask. This deletes all the pixels blocked by the layer mask, and then deletes the layer mask itself. Thus making this layer take a lot fewer bits to store!
Specifically, the one my mother learned from our neighbors in Zurich in 1958.
I’ve been so fixated on this recipe since then that I’ve never actually made any other. I’m sure others are good too; if I ate this twice a week for a month or two maybe I’d get to the point I would consider alternatives.
This is a very flexible, forgiving recipe, with a very high probability of a good outcome (I started making this in highschool, and have never had a serious failure, though I’ve had better and worse days).
It does take somewhat specialized equipment. After making it on the stove-top, you need to keep it hot on the table while it’s eaten. This is traditionally done with a simple alcohol burner, integrated with a stand to hold the pan. You can buy cans of methanol (methyl alcohol) to fuel it at every hardware store I’ve tried.
Burner, sitting on top of stand
The flame size is controlled by the handle on the burner; it rotates the metal piece with the little holes around the edge so that those holes correspond either less or more with holes in the metal layer beneath, so it controls the air supply to the flame. The solid metal piece to the left snuffs the flame when put on top of the burner.
Pot on stand (burner is underneath)
(The pieces pictured are the actual set my mother got in 1958; I had them bring a set back for me in 1973 which I also have, but I eventually inherited the original one and I use that for small dinners.)
The dish to make and serve the fondue in should be a relatively shallow, wide ceramic dish of the type pictured. I imagine you can improvise a lot, maybe even use an electric heater of some sort, and so forth. Do avoid metal pots, they tend to get too hot in places and the cheese burns on, which can affect the flavor and which is a pain to clean afterwards.
You also need proper forks; long enough, and with insulated handles, and aggressive enough tines to go through tough bread-crust and keep the piece of bread on the fork as you stir the fondue with it. I can’t find the good forks right now; they have three tines nearly 2″ long, somewhat long shanks, and bamboo handles.
I won’t try to tell you about the position of fondue in Swiss life; I was 4 in 1958, what little I know I read from the cookbook my mother brought back (with many other recipes in it, which I haven’t tried because I’m so fixated on this one). I’d probably be wrong for 1958, even more certainly wrong for now.
For me, it’s a festive special-occasion dish that’s still very easy to make, which I love, and which has long family connections for me.
Okay, actually making the fondue:
Ingredients
For 2-6 people (about what works in one bowl of the size shown).
Ingredient quantities are per person.
2 oz. dry, acidic white wine (a cheap sauvignon blanc usually works fine)
2 oz. Emmenthaler cheese (or American “Swiss cheese”), coarsely grated. Do not use any form of “processed” cheese, that leads to a grainy result.
2 oz. Gruyere cheese, coarsely grated. Do not use any form of “processed” cheese, that leads to a grainy result.
1 garlic clove, peeled and perhaps sliced. Anywhere from “rub the bowl with a cut clove” to a couple of cloves per person, depending on how much you and your guests like garlic. Among my friends, there is competition for getting the pieces of garlic when we eat the fondue.
In addition, you will need 1-2 Tablespoons of potato starch (substitute: corn starch) and 1-2 Tablespoons of Kirschwasser (cherry brandy; substitute: dry sherry).
And grating just a hint of nutmeg on top just before serving is nice.
While it is not an “ingredient” in the sense that it’s put into the pot with the others, you will need bread. Crusty bread, in small pieces (you’ll want crust on every piece you put on your fork, and you want the piece of bread plus the cheese that sticks to it to fit in your mouth). We make somewhat thick slices from small loaves (like baguettes), and then people tear those down to the size they want to put on their fork. I don’t like neat square pieces of bread for fondue, hence I strongly prefer tearing to cutting into neat cubes in advance. And people prefer different sizes.
Procedure
Place the pot on the stove. If you’re doing the “rub with garlic” do that now. Put the wine in the pot, and the garlic (if you’re doing that), and turn the heat on under it to medium low.
When it’s hot enough to start melting the cheese, add the cheese slowly (small handfuls) while stirring constantly. Let each addition mostly melt before adding more! (The two cheeses go in together, no need to make a distinction after the amounts are set.)
Keep heating and stirring until it’s all melted. It generally reaches a stage where the fat has separated enough that you think it’s ruined; don’t worry, that’s normal.
When it’s fully melted, mix the potato starch with the kirschwasser and stir that into the fondue. That will bind the fat back in quite a bit.
Just before putting on the table, grate a very small bit of nutmeg on top, if you like (do not stir in, it should be visible).
Eating
Light the burner and put the pot on the warming stand on the table, and start eating right away.
Really. Right away.
This is hard to arrange. People straggle in, and then mess around with getting bread and wine distributed, and such. It takes advance planning and some training of your family or guests to get it to go smoothly. Some people even try to eat their salad first or something (I generally avoid this by not having the salad on the table until we’re finished with the fondue).
It is the vital duty of every eater to stir the pot each time they “dip” a piece of bread. You do not just dip the bread, you drive it down to the bottom (impaled on your fork of course) and stir it at least one full round of the pot. This keeps it from burning on the bottom!
Figuring out when to turn down the burner also helps keep it from burning. If it’s bubbling (boiling), it’s too hot, turn it down.
The trick to avoiding dripping all over the table is to keep rotating your fork as you move it from the pot to over your plate. And keep rotating it over you plate while you wait for it to cool enough to put in your mouth (at least there it drips on your plate rather than the table cloth). This takes a little practice, but it’s much easier than, say, using chopsticks.
Late in the game, I’ve been known to wipe the bottom of the pot with a larger chunk of bread held by hand (when there is nowhere near enough to cover the piece of bread in the pot).
There’s a traditional thing I never get right towards the end; when it’s down to a very thin layer in the bottom, some people let it bake on and then peel it off and think it’s a special treat. I either get it too early, when it’s good but not that special, or too late, when it’s burned. Good luck!
The Meal
I tend to serve just the fondue (with bread), wine, and a salad as the meal. Either a traditional salad or a fruit salad works. Especially with the fruit salad, it also replaces dessert usually. I suppose if I stuck to the actual recipe rather than increasing the amounts about 50% I might be able to serve this as the center of a more traditional meal.
Drinking the same wine, or a better wine of the same type, as what you cooked with generally works well. A sauvignon blanc or an un-oaked chardonay can work well, or a real Chablis. Many of the same wines that go well with seafood go well here (they tend to be white, light and acid; all that cheese is very rich).