Workflow is one of the hot concepts in professional photography these days; most especially among event photographers, and also news photographers. The question of what you do with those 500 photos you just brought back from the Superbowl can be a pressing one. My workflow is not perfect. In some places I will seem to be complaining about the software I use to do a particular step; despite this, I’m fairly happy with my current choices, and the one thing I’d sort-of like to change is both expensive, and introduces another piece of software to learn.
A slow-shooting artistic photographer has completely different issues to contend with from mine; to the point where “workflow” isn’t mostly an important concept for them. They prepare far fewer photos for presentation, often just one or two from a session where they shot a dozen. Whereas I have been known to present on the web about 650 photos from a series of events that I brought about 850 home from.
Remember that some high-end wedding shooters will have more than 10,000 photos from an event.
I present my own workflow because it’s the only one I can explain as well as describe; and in fact the only one I can describe from first-hand experience, though I’ve engaged in workflow discussions with other photographers over the years. I don’t particularly propose mine for your use, though. But with luck, after reading this article you’ll know if there are any ideas you want to borrow, or not. A number of the steps aren’t the most obvious way to do things; sometimes I’ve selected the technique I use because I see a payoff later, not for the immediate benefits.
One thing that sparked this article is a recent big shift in my operational style, caused by acquiring a new piece of software. I now shoot RAW nearly all the time, and even when I don’t I use Bibble to make my web proofs or other batch image preparation (though sometimes I have hand-tuned the parameters for individual pictures).
Even the names of many of these steps aren’t standardized. What do you call the general process of preparing an exhibit for display (electronically or on paper)? I’ve heard it called “printing”, “Photoshopping”, “post-processing” (or just “processing”), and no doubt other things that aren’t coming to mind. The process of going through a collection of photos and picking the ones to display can be called “editing”, “sorting”, and just “selecting”.
The screen shots I’m using to illustrate many of the steps all click through to 100% versions. These may be large, but they’re guaranteed to be readable. The inlines I made large enough to just barely read if there was any hope, and default small size if there was not. Since your eyes and monitor differ, the choices are probably wrong for you; sorry about that!
Importing
The first step is getting the files from the memory cards (or field downloading device, or archive optical disks burned on a laptop in the field). Windows XP has features related to this, and there are many specialized products, free and commercial, for handling it.
I don’t use any of them. I’ve heard too many reports of people losing files to them, and that’s the worst thing that can happen to my photos. Probably the losses are due to user error, and I probably wouldn’t make most of those errors; but still, doesn’t seem like a good risk.
Besides, most of those products also incorporate file renaming, and I don’t want to rename the files yet; that comes three steps later in my workflow.
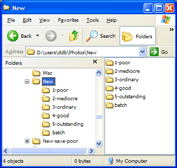 So I just drag-and-drop from the memory card (I have it configured to open an explorer window when I stick the card into the reader) to my “new photos” directory. There are special subdirectories under that directory, and special “favorites” settings in Thumbs Plus pointing to them, so it’s important that I start there.
Sorting
The next step is to find the files to eliminate. I want to do it now to avoid gaps in the numbering sequence later (after renaming; not to say that I don’t eliminate some files after renaming as well). In the process I also group the photos roughly by quality.
Here we get into specific software. Probably the top package for this is Photo Mechanic (and note that they call this step “editing”). I don’t use Photo Mechanic, despite amazingly fast performance in displaying the photos (remember, I’m looking at full-size un-processed RAW images at this stage much of the time), because of the cost, and because it’s another software package to learn.
I’m using my basic indexing package, Thumbs Plus, to do the sorting. If I had chosen ACDSee instead, I’d see faster opening of the big files to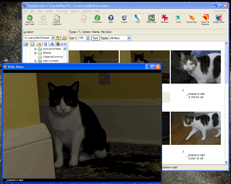 full size, but when I first evaluated the packages Thumbs Plus was a clear win, and I’ve found a clever way to get fast performance at adequate resolution from it.
The trick is to use slideshow mode. I can start anywhere in the directory (click a thumbnail to select), and with only a slight delay it starts showing me the photos from that point. The size is modest, but much larger than thumbnail size. It’s big enough to let me eliminate the obviously blurred images and other technical flaws quite easily and quickly. (Yes, that picture is seriously underexposed.)
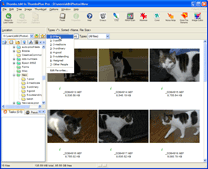 The other half of the trick is that, by establishing favorite “galleries” with names that cause them to sort first, I can move an image from my “new” to one of the 5 quality-level subdirectories with two keystrokes, period and a digit. Then I have to hit space to move to the next image; so this is three-key sorting, not perfect, but livable at the quantities of photos I come up with. The image loading time is spectacular, well under 1 second for a compressed D200 NEF (RAW) file. I can flip back and forth in the slide show that quickly, too, if I need to make decisions about adjacent photos.
 And if that isn’t good enough,
 shift+f8 opens all the selected images in tiled synched mode, where I can zoom in and out on all of them at once, and pan around over all of them at once, to make the hard decisions. This, incidentally, I find far nicer than the related ACDSee tool.
I can move images to the various quality subdirectories with the same short key sequences used in the slideshow, so it’s very convenient.
The quality levels I use are “poor”, “mediocre”, “ordinary”, “good”, and “outstanding”. I pretty much never assign anything to “outstanding” at this stage of sorting. Files put into “poor” will generally be deleted before renaming. Files put into “mediocre” will be considered again, and perhaps deleted, before renaming.
Renaming
The next step is to rename into my own peculiar format. What I’m using these days is:
ddb 20070827 010-xxx-orig.nef
(where the “xxx” is a sequence number within the batch). I like assigning my own ID rather than just keeping the camera names, because it’s easy enough to end up with duplicate codes on different cards (yes of course I normally set the menus to avoid that, but one little mistake and blooie), and so that the name gives me and other users a clue that it’s my photo, and roughly when it’s from (which is often the key needed to look up commercial sessions, as well as snapshot events). Also, when using multiple cameras, it’s nice to have the files sorted chronologically rather than by camera.
The tool I use to do this is Siren File Rename from Scarabee Software. It’s a very powerful freeware file renaming program for Windows (including older versions), with the ability to use all sorts of information from metadata in various file types, including IPTC and EXIF data.
You may notice that I have sorted the files into different directories before renaming them. If I now assign codes for quality level using Thumbs Plus, that information will be lost when I rename the files (because I put it in a user field in the Thumbs Plus database; I can’t put it into IPTC because NEFs don’t support it, and future image formats may also have this problem). But since they’re in different directories, how can I get them sorted chronologically?
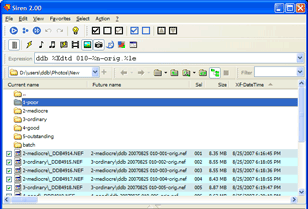 Easy, that’s one reason Siren File Rename is so good. I tell Siren to rename files in the subtree rooted at New, and it does so, sorting them by whatever column I choose (EXIF date/time in this case). And assigning sequence numbers based on that sort.
(Building renaming patterns in Siren can be complicated, and you can have some unfortunate accidents if you make the mistake of testing them on real files. They’re text-based, not drag-and-drop or anything. I find this entirely suitable, not so hard to use, and far more 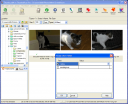 powerful than people generally bother with in drag-and-drop interfaces.)
Now, after renaming the files, I go assign the quality level codes (which I have defined as user fields in Thumbs Plus).
And then I drag all the sets of files back into the 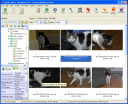 New directory.
Automated Proofs
I call them “proofs”, but for snapshots for example they’re likely to be the final version of the image. When I shoot 850 images (that was at a whole weekend worth of events with well over 100 guests, so it was a fairly low number really) I have to use some kind of automated system to make proofs.
First I used built-in facilities in Thumbs Plus (a batch scheme I set up, using automated contrast adjustment), and that was not horrid, but there were quite a lot I had to go in and re-edit by hand to get decent results, and I didn’t always do that.
Then I found Image Editor from Colour-Science AG. The cheap version handles JPEG only, but has pretty decent automatic color, contrast, gamma, and sharpening facilities, plus a very good user interface for doing manual overrides to that at the rate of 5 seconds or so a picture. This was a big improvement, at least when I was shooting JPEGs. The version I could afford also didn’t do color management, so if the image wasn’t in sRGB I had problems. I think this program made a big improvement in the quality of my proof galleries, and I bought the $65 version (you have to go to the $115 version, which I’m sure was more when I made the decision, to get RAW support, and the $780 version to get color management).
Then I found Bibble Pro. I’ve often seen it described as a “raw conversion” package, and it does indeed convert RAW files (superbly). But Bibble Labs calls it “Professional Photo Workflow Software”, and I think that’s a good description.
Bibble uses the “lossless editing” paradigm that I’ve become so enamored of with adjustment layers in Photoshop. In the case of Bibble, it stores all the settings you make for the file in a sidecar file (this avoids any risk of damaging the data while writing the original file, and allows them to support original file formats that don’t have a way for them to add their data internally, and keeps their lives much simpler I’m sure).
Especially when working from RAW, Bibble can do a lot with highlight recovery, and does pretty well in providing digital fill lighting too. There’s also a very capable automation module, on a par with what Image Editor can do (except that Bibble Pro supports RAW files, of course, and color management).
Furthermore, I can apply changes to any selected group of files at once, and it only changes the attributes I actually adjust. I can apply 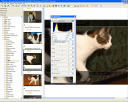 one set of default adjustments to all files, and then select groups that need different adjustments, and then go down to individual files that need may need unique adjustments. I can also set cropping for individual images. Oh, and it’s available in Windows, Mac, and Linux versions, though I haven’t used any but the Windows version so far.
What it doesn’t have is ways to do masking, not even gradient masks (often very useful in dealing with flash falloff). But masking tends to be unique to an individual image, at least when I’m shooting handheld. When I’m doing that level of detail I just go into Photoshop.
Bibble contains a basic version of Noise Ninja which by good fortune (or, perhaps, intelligent choice on both sides?) is the noise reduction software I was already using. And when the full registered Noise Ninja is present, Bibble uses that, too.
This adjusting by groups lets me make human-adjusted proofs of images much faster than any other scheme I’ve used. I get results better than “video-analyzed” prints from a pro lab (you youngsters don’t worry about it, you’ll never need to know) in very little time.
Once I’ve made those adjustments, I can submit the photos to batch queues to make web-sized JPEGs, or print queues to directly drive my printer, and so forth. I can throw them into multiple queues. And the processing is blazingly fast even for RAW files.
Bibble works just the same way on JPEGs, camera originals or from some other source, and it’s just as useful for handling piles of snapshots.
So, there, perhaps a bit abruptly, we have it. I’m rather enamored of my current workflow, despite problems like the quality codes I assign in Thumbs Plus not being accessible in Bibble (which uses its own “star” system of ratings). I’m using too many pieces of software as it is, but each of them brings a lot to the table, and I wouldn’t want to give them up.
If you’ve gotten through this whole thing, I guess it was of some interest to somebody other than me :-).