I’ve temporarily given up on getting incremental send/receive working. I’m liking my results with full backups, and have some reason to believe that the next OpenSolaris release will fix the bug I’m seeing, and can’t see how to proceed on that in the short term. With a third backup drive, having just full backups isn’t so limiting, either.
I’ve got the 4x 2.5″ adapter installed in the 5.25″ bay, and the 8 port SATA controller hooked up to it, and two drives in it, and I’ve copied the system rpool to a new pool there called rp2. And am now looking at details of how to finish making that pool bootable, probably involving booting from a livecd to rename it among other things.
Weird problem with the SATA controller—the bracket on the end of the card doesn’t match the cutout in the case. I had to remove the bracket, leaving the card unsupported, which is clearly not viable in the long term with two sets of stiff cables attached to it (right now it’s supported with a bit of gaffer’s tape).
Haven’t looked into booting from the new controller, either; it’s possible I can’t, I suppose, but if so putting both boot disks on the old controller isn’t terribly painful, though it ruins my perfect plan to split every mirror pair across controllers.
There’s also a problem with the bottom left 2.5″ tray, but I’m ignoring that for now since I only need two drives in the 2.5″ bay to finish my upgrade.
Don’t know that it might not be better to install to the new drives from scratch, but there are issues duplicating the configuration down to UIDs and GIDs, which is necessary for the data pool to be accessible to the users when I import it.
Still, all the new hardware seems to be working, which is good.
Recreated wrack, the USB backup drive with the oldest data on it, using my updated scripts, and started a full backup, also with the updated scripts. Was running fine when I went to bed.
Seems to be hung when I got up this morning, dammit. System and pools are responsive, but there’s been no progress and no disk IO since I first checked when I got up. Haven’t tried to kill any processes yet; waiting to see if the zfs-discuss list has any data-gathering suggestions.
This older software version doesn’t support the -p option in zfs send, but that won’t be the cause of the hang; that will simply require me to recreate some key properties manually if I have to restore from backup.
It’s sitting at the same spot after work, after sitting all day. Offiicially hung.
I wonder what it will take to stop the backup and export the pool? Well, that’s nice; a straight “kill” terminated the processes, at least.
zpool status shows no errors. zfs list shows backup filesystems mounted.
zpool export -f is running…no disk I/O now…starting to look hung.
Ah, the zfs receive process is still in the process table. kill -9 doesn’t help.
Kill and kill -9 won’t touch the zpool export process, either.
Pulling the USB cable on the drive doesn’t seem to be helping any either.
zfs list now hangs, but giving it a little longer just in case.
Kill -9 doesn’t touch any of the hung jobs.
Closing the ssh sessions doesn’t touch any of them either.
zfs list on pools other than bup-wrack works. zpool list works, and shows bup-wrack.
Attempting to set failmode=continue gives an I/O error.
Plugging the USB back in and then setting failmode gives the same I/O error.
cfgadm -al lists known disk drives and usb3/9 as “usb-storage connected”. I think that’s the USB disk that’s stuck.
cfgadm -cremove usb3/9 failed “configuration operation not supported”.
cfgadm -cdisconnect usb3/9 queried if I wanted to suspend activity, then failed with “cannot issue devctl to ap_id: /devices/pci@0,0/pci10de,cb84@2,1:9”
Still -al the same.
cfgadm -cunconfigure same error as disconnect.
I was able to list properties on bup-wrack:
bash-3.2$ zpool get all bup-wrack
NAMEÂ Â Â Â Â Â PROPERTYÂ Â Â Â Â Â VALUEÂ Â Â Â Â Â Â Â Â Â Â Â Â Â SOURCE
bup-wrack size          928G               -
bup-wrack used          438G               -
bup-wrack available     490G               -
bup-wrack capacity      47%                -
bup-wrack altroot       /backups/bup-wrack local
bup-wrack health        UNAVAIL            -
bup-wrack guid          2209605264342513453 default
bup-wrack version       14                 default
bup-wrack bootfs        -                  default
bup-wrack delegation    on                 default
bup-wrack autoreplace   off                default
bup-wrack cachefile     none               local
bup-wrack failmode      wait               default
bup-wrack listsnapshots off                default
It’s not healthy, alright. And the attempt to set failmode really did fail.
ETA: So I had to reboot. However, that worked fine, and I recreated the pool, and I ran the same full backup script overnight, and it completed successfully. Took 392:23, a bit over 6 hours, but it completed. (Something broke the ssh connection, but luckily I had run the backup under screen, so it just got detached and I could reconnect and see what happened. And it was making a log file, anyway.)
There’s a ‘cut’ version error in some of my after-backup processing that I’ll need to fix.
Good news in automatic email: a bug I filed is fixed in build 122. Now, it’s a duplicate of another bug that I apparently failed to find, and there’s been an easy workaround all this time (turns out it was a pointer problem in parsing file paths, triggered by not having a “/” at the end of a directory path). This was apparently what was blocking my ability to do incremental backups with ZFS send/receive.
This makes software update key, not that it wasn’t already.
So I have had to re-install Virtualbox (because VMWare player won’t work with virtual machines on my network drive, whereas VirtualBox will), and reinstall Solaris. Then I will learn how to upgrade to various builds, because I’m ashamed to say I don’t know how except to “current”, which may not be the place to be.
Huh; almost looks like there isn’t a way.In future, I can update more often, and keep the old snapshots around. Though that doesn’t give any way to reinstall if what I really need is an old version.
I’m updating a virtual system, to test techniques and such. It’s downloading very slowly, equally slowly in bridged or NAT mode. So it’s not going to be done tonight, which means the testing will be delayed and the actual upgrade thus even more delayed. Well, things take time.
So far, knock on wood, nothing has gone terribly wrong.
ETA: The update (switching to the dev branch) completed overnight, with a number of errors. The new Boot Environment doesn’t come all the way up. No time to check more this morning.
The home fileserver is getting an upgrade. It’s reaching 90% full on the current disks, which is really about as far as it’s good to go if you’re going to upgrade (ZFS balances the load better when you add an additional vdev before the existing vdevs are too full).
Last night was step one (well, maybe step 30; counting all the consideration and research and ordering steps). I installed the memory upgrade, taking it from 1GB to 3GB (and filling all available memory banks), and then upgraded the swap space.
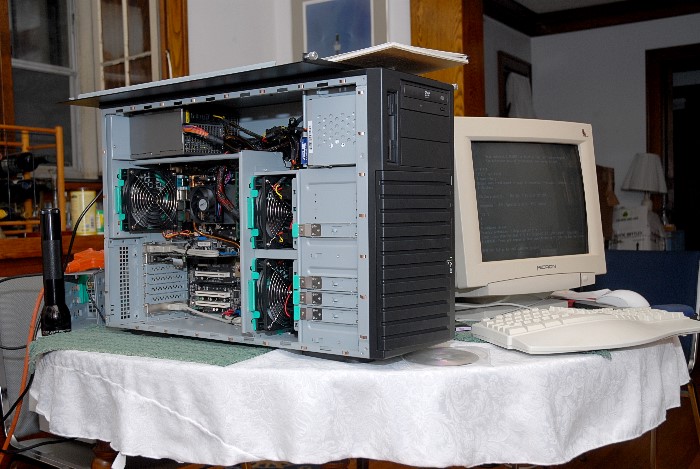
For what I’m afraid will be the last time in this series, I can report that it went completely smoothly. I remembered how to open the case (on this one, you release the tabs holding the front on at the top, tilt the faceplate down, and that gives you access to the screws holding the side panels), I didn’t break anything while vacuuming out the dust, I figured out which way the memory sticks went in, and they went right in).
Background on This Server
I think this hardware dates to August 2006. It’s running Solaris using the ZFS filesystem (which is why it’s running Solaris). It’s named “fsfs”, because it’s my redundant fileserver (all the data disks are mirrored).
Chenbro case
The hardware is a Chenbro case, actually a 4u rackmount with 8 hot-swap bays, but I’m using it as a tower. It’s very deep, since the bays in front don’t overlap the motherboard at all. ASUS M2N-SLI Deluxe motherboard with AMD dual-core processor. That motherboard has 6 SATA ports, so I’m not currently using two of the hot-swap bays.
Two of the bays are for the system disks (mirrored). The other 4 constitute the data pool. Currently this is two mirrored pairs of 400GB disks (two of them free from Sun, when they gave up on using anything that small in the Streaming lab).
While the processor is old, it’s marvelously adequate for what it’s called on to do; and the case was the expensive part. I don’t want to mess with it, and certainly don’t want to buy another hotswap unit at this level. So I’m upgrading this one.
Upgrade Plan
It’s getting new boot drives (2.5″ disks in a new hot-swap bay; you can get a 4-drive 2.5″ hot-swap bay that mounts in a standard 5.25″ bay), a new disk controller to give me 8 more ports, and new boot disks (in the 2.5″ bays, freeing two of the main 3.5″ bays for data disks).
The current plan of operations goes like this:
Upgrade memory (completed)
Update backups
Update software
Update backups
Install 2.5″ hot-swap bay
Install new 2.5″ boot drives
Install new controller
Install software (or transfer existing installation) to new drives
Remove old boot drives
Install a new pair of drives in the data pool
Update backups
The new controller is to be the Supermicro UIO MegaRAID AOC-USAS-L8i. This needs weird expensive cable sets, but with the right ones, it’ll drive 8 SATA drives from something that looks like a SCSI controller to the computer (it’ll also drive SAS drives, handle port expanders, and generally do a lot of stuff, and Solaris supposedly has good drivers for it). This will be my first experience with SAS; we’ll see how exciting that is.
You’ll notice I’ll end up with 12 hot-swap bays (4 2.5″ and 8 3.5″). With 6 SATA ports on the motherboard, this means that I can split each mirrored pair across controllers, meaning that hardware failures and driver bugs can’t take out both sides of the mirror at once. There are still plenty of other single points of failure, including power surges, higher level software bugs, user error, and so forth; that’s why we still need backups.
ZFS
ZFS is the “zettabyte filesystem”. It’s a combined volume manager and filesystem, engineered from scratch. And in fact it eliminates all sorts of annoyances, and adds some big features. It was created by a team at Sun Microsystems (now a division of Oracle)
For me, the three big features are:
Pool expansion
Data checksum and scrub
Snapshots
This server holds my photo archive, including scans of very old stuff. While I may not look at it very often, I do care about it. I have backups, and can restore if necessary, but a precondition to that is realizing it’s damaged. I could continue making backups and rotating them through storage and not notice a picture got corrupted for years, by which time the last backup that included it would be gone.
ZFS stores a checksum for every block. An operation called “scrubbing” goes through all the blocks and verifies them against their stored checksums. By doing this, I can discover early that something is damaged. If the damage is a disk error, the redundant copy on the mirror drive will be automatically used to fix the problem (if its checksum is correct). If there isn’t a valid copy of the data online it can at least tell me which file is bad, early enough that I should still have a valid backup. This makes me feel much safer. I think it even makes my data really somewhat safer.
Snapshots are great for keeping the last month or so of changes easily accessible online. Furthermore, I use snapshots on the backup disks too, so on only two backup drives I actually keep several years worth of change history.
Pool expansion lets me add more space without recopying everything. I’ve chosen to use mirrored pairs instead of RAID-5-style parity schemes (RAIDZ, it would be in ZFS). It lets me upgrade disks in smaller chunks (because in addition to adding a vdev to a pool, I can also replace the drives in an existing vdev with larger drives, and have that space become available). I don’t expect to ever have more than 8 hot-swap slots (well, 8 for the big drives I’m using for data), so working in small units, pairs, gives me more flexibility. I rather expect to stop at 6 data disks (3 pair) and put in a seventh “hot spare” that ZFS can immediately copy data to if something happens to one of the live disks. Using 4-disk RAIDZ vdevs, I would get a higher proportion of the drive space available for use, but I’d have no space for hot spares, and I’d have to replace disks in groups of 4, and I’d have less redundancy and hence more exposure to data loss (luckily I do keep backups).
This has been a real pain, due to incomplete and misleading documentation. I believe I’ve finally gotten it to work again, and I need to write down in some detail what I did.
This is based on installing OpenSolaris 2008.11. The two disks I want to make my root pool are c5t0d0 and c5t1d0. The general process is to install on one of the disks, and attach the second as a mirror later. Most of this requires root, and I see I haven’t been too careful showing that. Sometimes the “pfexec” command is showing, which is the OpenSolaris roles-oriented equivalent of sudo for executing one command with the root role.
First point: while in general you want to give ZFS whole disks to work with, you cannot do that for a root pool that you intend to mirror. There’s a nice convenient “whole disk” option in the installer, too, and no warning that you shouldn’t use it if you want to mirror later.
So, let’s say you’ve gone ahead and installed with nearly all of c5t0d0 as your zfs root pool (it’s called rpool), and now you want to make it a mirror.
First, using the format tool, see what the partition structure is (what I expect on an x86 box is one fdisk partition occupying the whole disk, and a set of Solaris slices in that). In my case, I think what the installer always does, s0 is the root slice, and it occupied cylinders 1-9724 on a disk having cylinders 0-9725. In any case — duplicate this structure on the disk you intend to mirror with (c5t1d0 in my case).
At which point your second disk will look like this:
The “-f” is necessary because, in previous playing around, I’ve sometimes managed to get a recognizable part of a zpool on that slice, so I have to tell zpool to overwrite it. So be VERY careful using -f! Don’t do it at first, and if you get an error and you’re SURE you really want to overwrite the old data, then use -f.
So this was very successful:
localddb@fsfs:/boot/grub$ zpool status
  pool: rpool
 state: ONLINE
 scrub: resilver completed after 0h3m with 0 errors on Sun Jan 18 11:28:36 2009
config:

	NAME          STATE     READ WRITE CKSUM
	rpool         ONLINE       0     0     0
	  mirror      ONLINE       0     0     0
	    c5t0d0s0  ONLINE       0     0     0  25.6M resilvered
	    c5t1d0s0  ONLINE       0     0     0  3.57G resilvered

errors: No known data errors
Now, to do a really complete job, you need to install grub on the secondary disk as well. In fact zpool will tell you you should do that. If you don’t do this, you won’t be able to boot from just the second disk when something happens to the first one. (Yes, “when”. Murphy rules!)
So, to install grub:
localddb@fsfs:/$ cd /boot/grub
localddb@fsfs:/boot/grub$ pfexec installgrub stage1 stage2 /dev/rdsk/c5t1d0s0
stage1 written to partition 0 sector 0 (abs 16065)
stage2 written to partition 0, 267 sectors starting at 50 (abs 16115)
And that should be that.
A suppose a truly wise admin would play with various failure modes and recoveries before going on to install much on this base.