Added this at the last minute. If I’m reading the history right, it was a failed commercial product released into the wild.
Like DarkTable, LightZone is based on a set of modules that perform different functions, which can be stacked in any order (and instantiated multiple times). It also has the blending mode options available.
LightZone has “regions and masks”, which can be applied to all tools, allowing you to do local adjustments. There is also a specific clone tool, and a red-eye fixer. Regions/masks are all vector, though, you can’t enhance them with bitmap editing, which makes them not up to anything beyond the simplest masking (a bit beyond what an old-style split neutral density filter could handle, but only a bit).
The “zonemapper” function, and the “relighting tool”, look particularly interesting.
Specific Issues
Responsiveness
When I select a photo in the filmstrip, it appears in the editing window quite quickly. Ah, but switching from browsing to editing mode is slow.
Unchecking, for example, the raw processing filter, it flicks back to the previous state quite promptly. But when I then click it on again, it appears to perform the noise reduction again, complete with on-screen progress bar. Something much faster is needed; flicking back and forth bewteen two versions of a photo is perhaps the most important performance metric in such a processor, since that’s the primary way of deciding if a setting is right.
The “orig” icon in the toolbar does seem to be a little faster in flicking back and forth, but only between the full stack and the original.
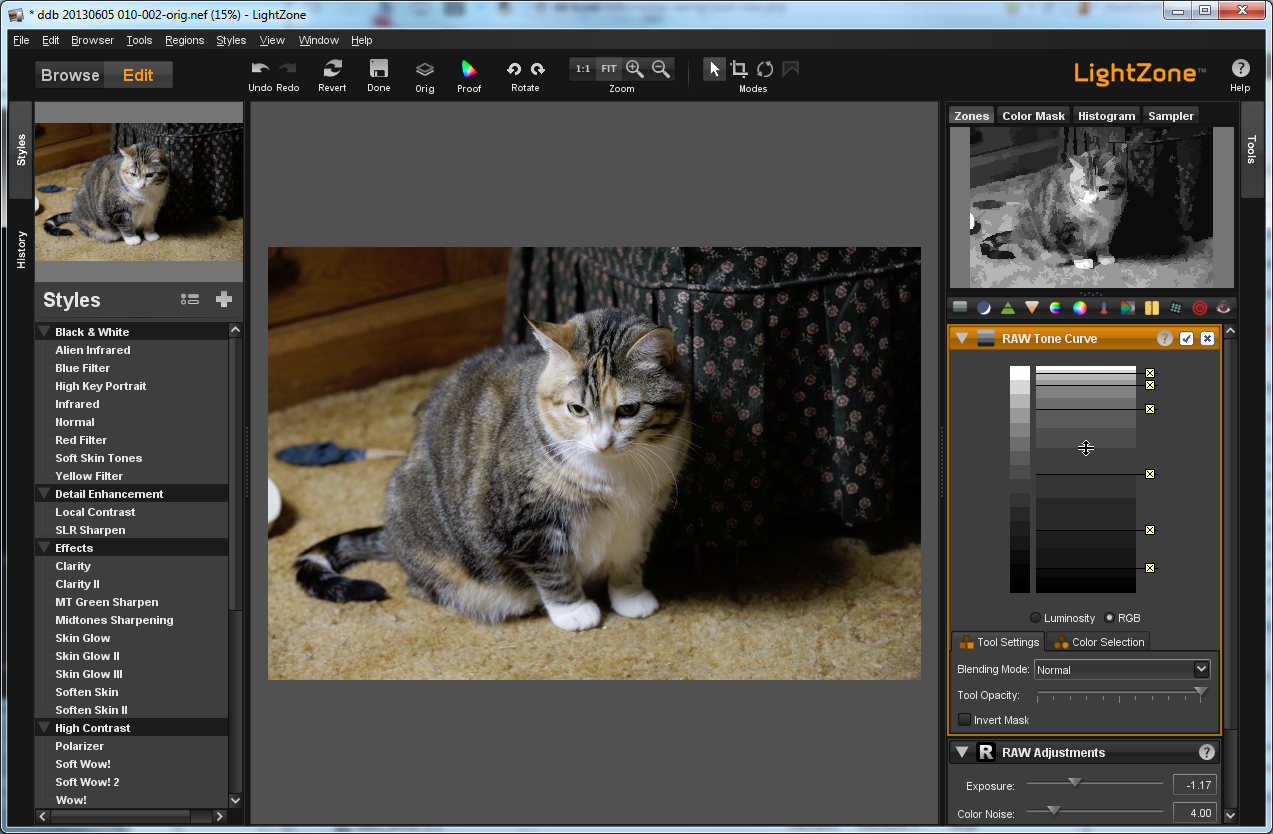
ZoneMapper / RAW Tone Curve

This lets you mark points in the source value space and drag them to where they should be placed in the destination value space. So it’s equivalent to the standard curves tool, but gives you a different display to work with. It’s also mated with the Zones info panel, and will show you where the zone you’re about to drag appears in the photo.
There doesn’t seem to be a way to go from a point in the image to a zone. Using the zone display at the top, picking a zone will highlight at low res where it is in the image, but that results in clumsy searching. I want to be able to click in the image and have that place me on the right zone (and similarly for tone curve).
Also, I’d like a curves presentation option for this adjustment.
Ratings
It’s not picking up the existing ratings on my ORF files. Hmmm; also NEF files, which is inexcusable. When I set a rating via LightZone, it appears briefly over the thumbnail (sometimes tenths of a second, sometimes seconds), and then disappears again, not to reappear. It also doesn’t show in the metadata panel to the right. Looks like ratings are completely broken.
The rating doesn’t appear on the editing screen, either.
Screen Layout
It seems to be fixated on putting the thumbnail strip (filmstrip) across the bottom of the screen, where it steals irreplaceable vertical space (which, since the advent of the “widescreen” monitor, is always the limiting factor in photo viewing size).
I don’t seem to be able to get rid of the left column, which is tabbed between is styles list and a history tool. Again, wasting screen space like this is very bad, there’s never enough screen space even with dual monitors one of which is 26″. Also I can’t tear it or the other panels off and put them on the secondary monitor, it doesn’t look like.
Noise Reduction
The noise reduction isn’t impressive. Also there are two tools, a “color noise” slider in the “RAW Adjustments” filter, plus a “Noise Reduction” filter. Since I can hardly detect an effect from the one in the RAW Adjustments filter, I’m ignoring that one.
Relighting
The “depth” slider definitely does something, but I can’t figure out what, and the official name and description don’t help me much in finding it. Also it’s a bit weird that the range of the slider is from 8 to 64.
Crop Tool
The crop tool gives me a 3×3 grid while adjusting the cropping. That’s one of the more popular choices, but I’ve been playing with 5×5 and can’t seem to change to that. And some people don’t like a grid at all. This should be settable. (Some people also like more complex things, “golden rectangle” and “golden spiral” and the like.)
Example Images
Derby
The noise reduction isn’t much good. It’s either essentially ineffective, or quite artificial looking (with frequent missed dots), depending on how I set the sliders.
Huh; turns out the “Relight” filter has much more interesting effects if it’s not disabled. Who would have expected that? I was briefly wondering if I’d gone blind, when so many controls had no visible effects even with extreme movements.
The “detail” slider in “Relighting” is interacting quite nastily with noise in this image (which is ISO 6400).
Throwing away a lot of the blacks and using that space for the midtones seems to have been the winning option for this photo in this processor (using the zonemapper).

Dr. Mike
This is a JPEG original. So the noise problems are worse. Again, I get a mix of plastic and noise tuned up into spikes.
I’m also badly missing any sort of conventional brightness / contrast / white point / black point control, to move the whole image around. Luminosity in the “Hue/Saturation” filter helps some.
And the program crashed as I tried to switch back to browser mode to pick the next photo to work on.

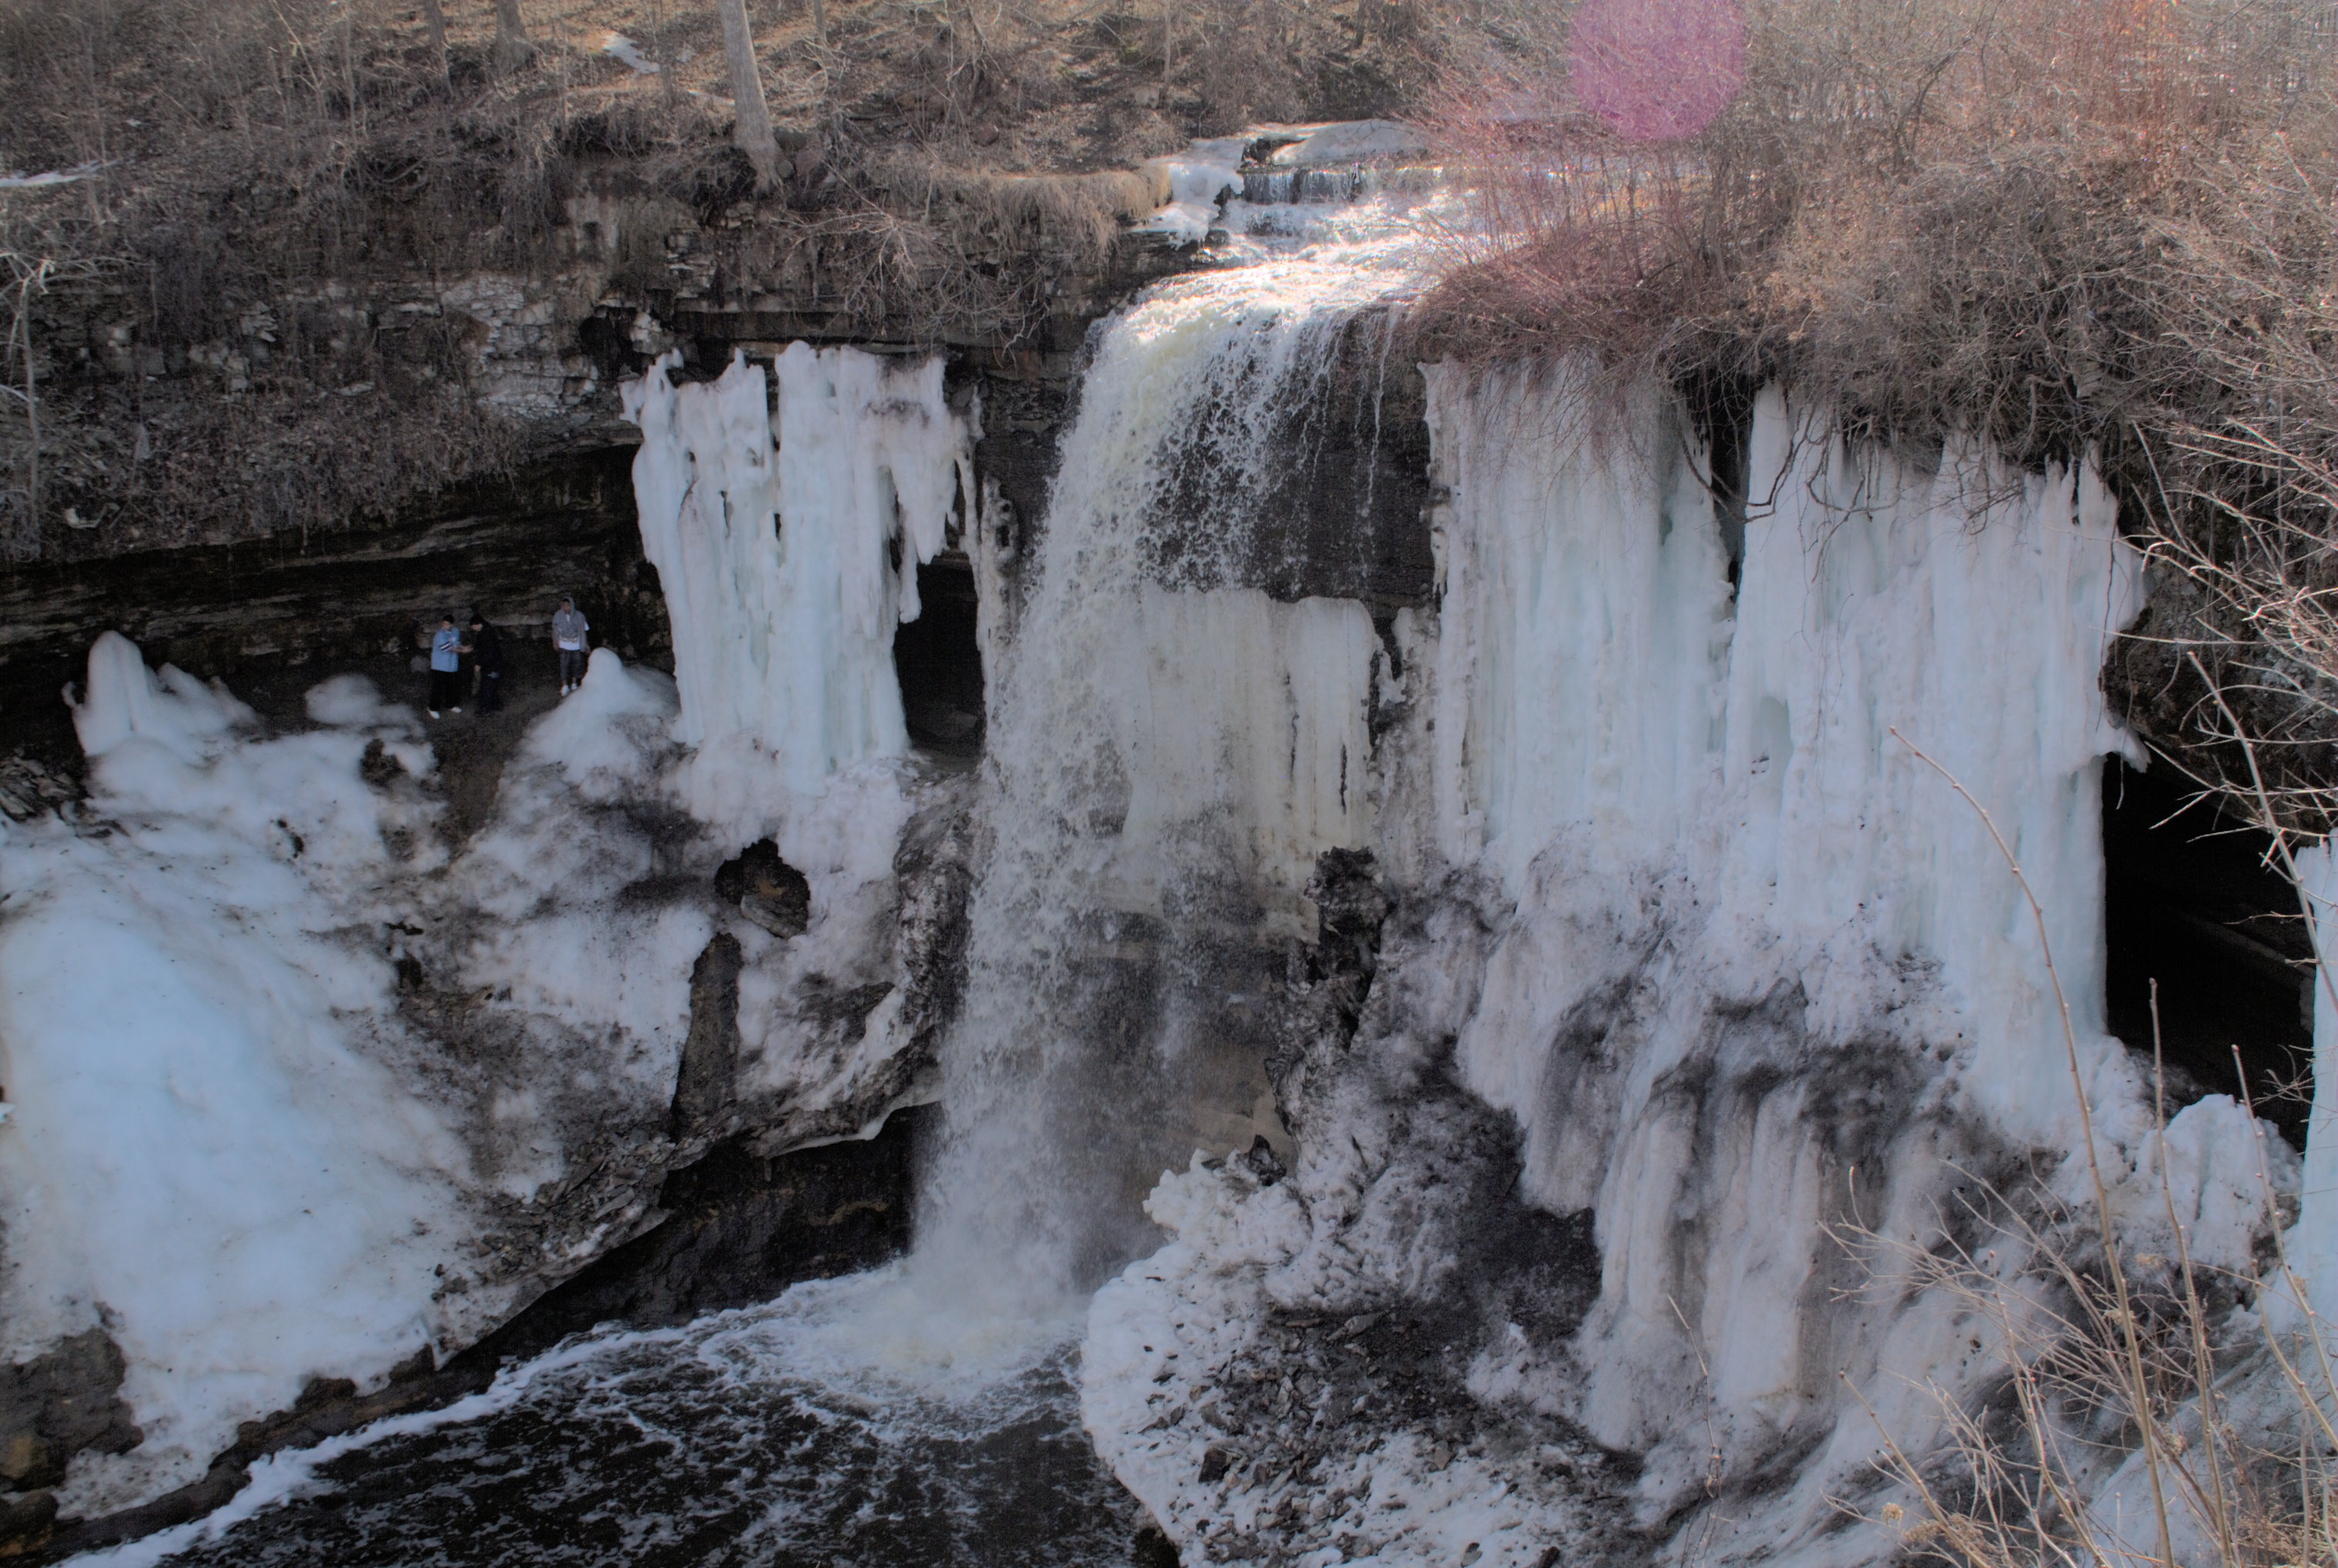
Minnehaha
LightZone does seem to be happy to open Fuji S2 raw files, either directly or as converted to DNG.
I’m getting pretty decent results from stacking Zone Mapper tools here.
Naomi

Purple Flower

Doc Smith Books
Tux Cat
I’m one of the principals of the LightZone Project. If I may make a few comments?
LightZone isn’t a “failed” product so much as an “abandoned” one. During its commercial heyday of 2005-2011, it won a number of awards. At about the same time that Adobe introduced Lightroom, Apple introduced the iPhone. LightZone’s developer became intrigued with the iPhone, and in 2011 he joined Apple and quit selling and supporting LightZone. At the end of 2012, the developer released the source code, and the all-volunteer LightZone Project is bringing LightZone back.
LightZone is now available free of charge for Windows and Linux, and the Mac version is finishing up its beta test.
Regions/Masks: While LightZone doesn’t offer pixel masks, it does offer selection by color and brightness. These are often much easier to use. Just draw a rough outline around the area, then select the color or brightness of the object that you’re interested in.
ZoneMapper: Thinking in terms of the ZoneMapper is indeed one of the challenges for those who are accustomed to working with curves. It’s different, for sure. Something that’s usually an advantage to the ZoneMapper approach is that you can’t produce negative contrast — if pixel A originally was brighter then pixel B, it still will be at least as bright after the adjustment. Also, unless you select otherwise, ZoneMapper operates in Luminosity mode, which preserves colors better than conventional RGB curve tools.
Ratings: LightZone’s metadata handling is indeed rudimentary. For now, it should be considered to be software for adjusting images, not for rating, labeling, cataloguing, etc.
Screen Layout: the filmstrip only appears across the bottom of the screen in the Browser. Once you select a photo to edit and switch to the Editor, it’s not there. You get all of the space from the bottom of the toolbars on down for editing.
You can get rid of the left column by clicking on the currently selected tab. If you’ve got styles showing, click on the Styles tab. If you’ve got history showing, click on the History tab. After that, you’ll probably want to click the “Fit” button to expand the image to take full advantage of the increased space.
Noise Reduction: Yeah, the noise reduction in LightZone pretty much sucks. It’s probably not worth the CPU time to activate it.
Relighting: The Depth slider on the Relight tool adjusts the apparent “flatness” of the lighting. At the left end you get flat lighting, at the right end the lighting looks more hard.
By the way, there’s a “?” icon in the title bar of each tool that brings up the help file description for that tool.
Dr. Mike and controls: Brightness control is available through the Luminosity slider on the Hue/Saturation tool, as you’d found, and also in the RAW Adjustments. Black point and white point are set with a ZoneMapper.
Contrast isn’t a simple thing, and many of LightZone’s features are aimed at helping the user achieve better tonal control than other software provides. I’ve written up a short discussion of contrast on the LightZone Project web site: http://lightzoneproject.org/lorum/thoughts-contrast
So… working with LightZone is rather unlike working with any other digital darkroom software out there. It’s particularly well-suited for creating and manipulating B&W imagery. Some people will like the way LightZone works, many will dislike it. For those who do like the way it works, LightZone delivers unbeatable “bang for the buck” (since it’s free of charge).
Thanks for taking the time to review LightZone.