Many of you won’t care, but some of you desperately need to spend the time to watch this video.
It’s Ctein demonstrating actual dye-transfer printing (to Michael Reichmann of the photo website Luminous Landscape).
Many of the interesting parts of the process are done in normal room light, so you get to see the real thing, and you see the equipment and hear about the process for the bits done in the dark.
All my life dye transfer has been the top color photo printing process. And for a long time I’ve been privileged to be a friend of one of the very few people who ever did dye transfer printing.
Kodak discontinued the materials in 1994, and Ctein finally closed down his darkroom in 2013. There have been a couple of print sales along the way, too. This one is probably the absolutely final one. This is selling off all the prints remaining in inventory.
Here’s the official press release on it. Note that the first URL given is the top level of The Online Photographer; you’ll need to check “Recent articles” in the left column to find the print sale post when it goes up on Black Friday.
Expert West Coast Photographic Printmaker to Liquidate His Entire Inventory of Rare and Prized Color Prints
San Francisco area photographer and master printmaker Ctein is offering his entire lifetime archive of rare traditional dye transfer prints for sale. The sale will take place on The Online Photographer website (https://theonlinephotographer.typepad.com/) starting at noon Pacific Standard Time on November 29th, the Friday after Thanksgiving, and continue for seven days only.
Ctein (his only name—pronounced
“kuh-TINE”) is selling full-sized 16×20-inch dye transfers for only $650
per print on a first-come, first-served basis. More than 250 images
will be offered. Interested readers can view these in advance at http://ctein.com/2019TOPDyeSale.htm.
Ctein, among the best-known and most
accomplished of the dye transfer printers, worked in the medium for 40
years until he closed his darkroom in 2013. Now, connoisseurs can own a
beautiful, genuine dye transfer print for their own collections.
Dye transfer, widely acknowledged to be
the Rolls-Royce of traditional color printing methods back in the era of
film photography, was extremely difficult to master and expensive and
time-consuming to practice. Dye transfer prints have a distinctive
beauty and purity of color. They have a greater color gamut and deeper
maximum black than even inkjet prints, and were among the most permanent
of all color processes.
Such prints were always rare and always expensive, and master printers in the medium have always been few and far between. By 1994, when Kodak finally discontinued making the materials, most of the active dye transfer printers in the US could fit in a single living room. Now a scant handful are left.
For more information, please contact Ctein at ctein@pobox.com or Mike Johnston of The Online Photographer at mcjohnston@mac.com.
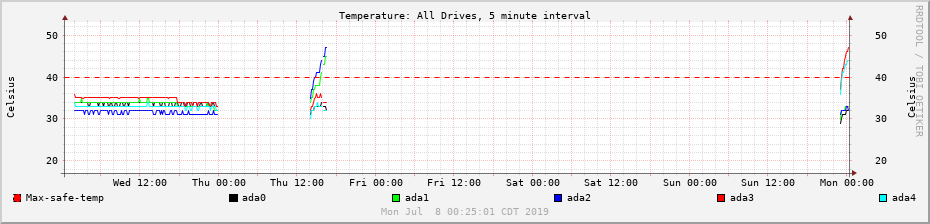
Temporary placement of a fan in front of the internal drive bay resolved the heat problems (which I’ve let run for over a year; stupid me).
When I also had to replace the power supply (it’s suspect in the lockups, not yet proven) I removed the temporary fan (mounted with double-sided tape), and had it come apart in my hands and stop spinning when powered (it was old, it was a test). (Another lockup factor is that it wasn’t getting assigned the right IP address; that made it look like it booted locked, until I logged in from the console.)
And the new modular power supply (200 watts bigger than the old) required me to replace and hence re-route all the power cables. So I messed with the rest of the cables as well (6 flat SATA cables can block some air!).
Temps are back within bounds–but not as good as before, there are two drives up close to 40. Not sure what the difference is from the test state! These darned analog, even physical, things are a lot of trouble.
Heat buildup on three boot tries; temporary good state at the left, new tolerable state at the right.
New power supply, 200 watts stronger than old, not old, and also more efficient.
Parts for the new fan mounting attempt, plus misc. wiring.
Fan, ready to go into case.
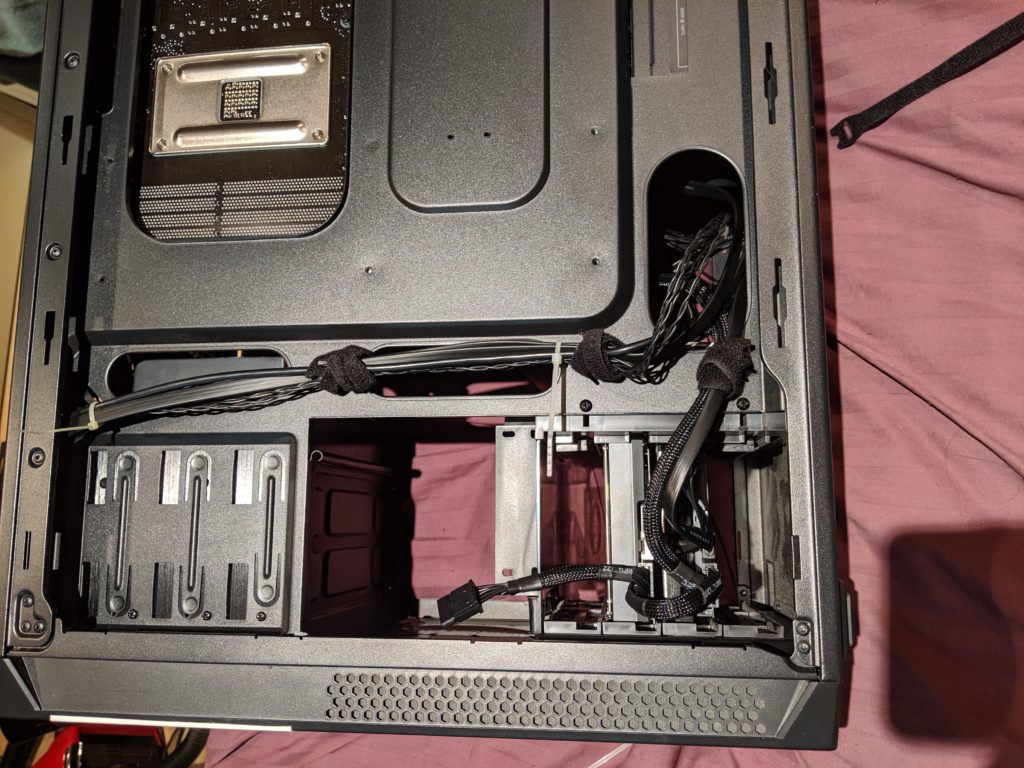
The USB cable adapter (motherboard to case front panel) showed some tendency to come unplugged, so I kludged that up pretty thoroughly.
All the busy power and signal cabling up in that corner of the motherboard. Now arranged so there’s *some* room for airflow to the internal drive stack.
CPU (center) and 2 chassis fan connections, routed out of the way of power connectors and bundled (above right, to the side of the fan there).
From the bottom, front panel cables now routed down there rather than on top of the motherboard. Also power and SATA to the internal drive stack are back here.
Back of the switch and LED cables coming in from the front panel to the motherboard.
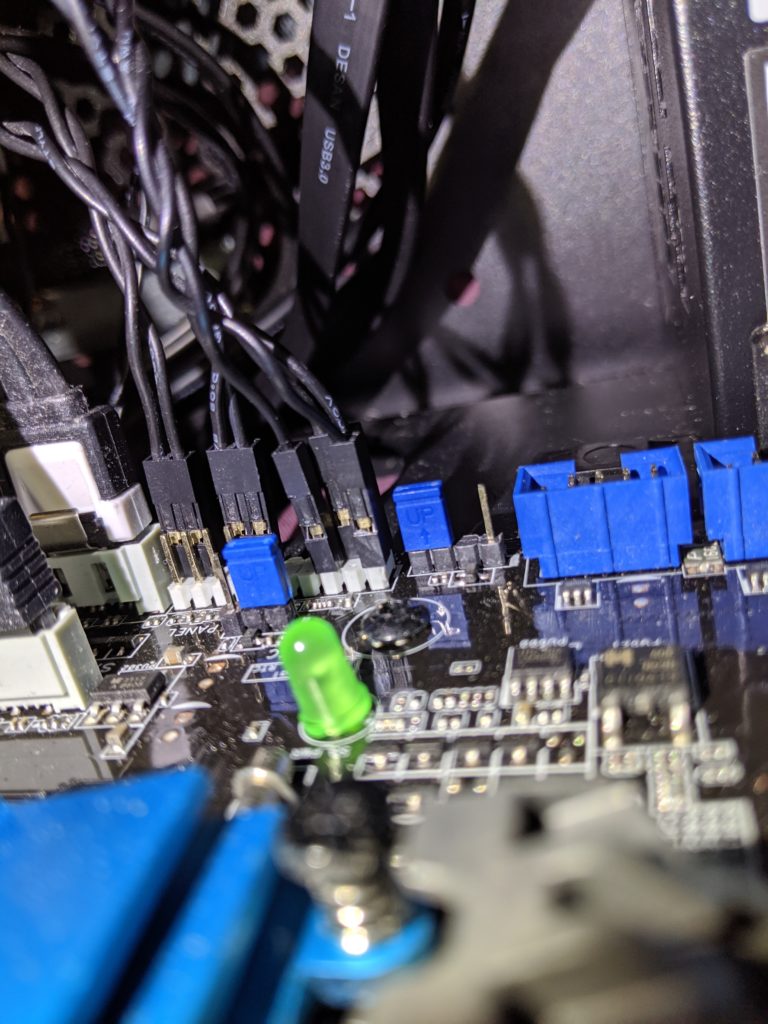
Fan installed in front of internal drive stack (and all other cables going through there removed or pushed aside).
Fan in place, showing correct airflow. 4 of the SATA ports are on the motherboard at top left.
Space between the power supply and the internal drive stack is at a premium, and kind of messy, even without the fan in place. All the case cables pass through here as well, and connect to the motherboard at that corner. The 6 SATA ports are just in from there. Crowded.
All the busy power and signal cabling up in that corner of the motherboard. Now arranged so there’s *some* room for airflow to the internal drive stack.
SATA to hot-swap adapter bay now routed underneath (and bundled in a stack of 4).
The order of the gallery is kind of messy. First the photos I uploaded were added in reverse order, and then the light table on which I can drag them to arrange the order is a bit weird, and finally there’s no way short of going into edit mode to see the photo big enough to be sure what it is. So after a while I got annoyed and stopped improving it.
I found some important info about adobo sauce, which I think has helped. Also, this is the crockpot-adapted version, no other cooking vessel got dirtied. We’ll see. Of course I neglected to make notes of the intermediate experiment which worked so well; we’ll see how this crockpot-specific version goes.
Ingredients:
2T olive oil
4 yellow onions, minced
10 cloves garlic, minced
3 pounds chicken (frozen in big chunks)
2T powdered ancho chile
1t freshly ground black pepper
2T cumin seeds
1/8t ground cloves
2T apple cider vinegar
4T oregano
Couple of good pinches of salt
4 cups chicken stock (bouillon)
Directions:
Place onions and garlic at bottom of crockpot. Add all seasonings, and layer the chicken pieces on top of that. Pour boiling water over this to cover.
Cover the crockpot and set on high.
When done, shred chicken with forks. Probably add flour or masa to thicken.
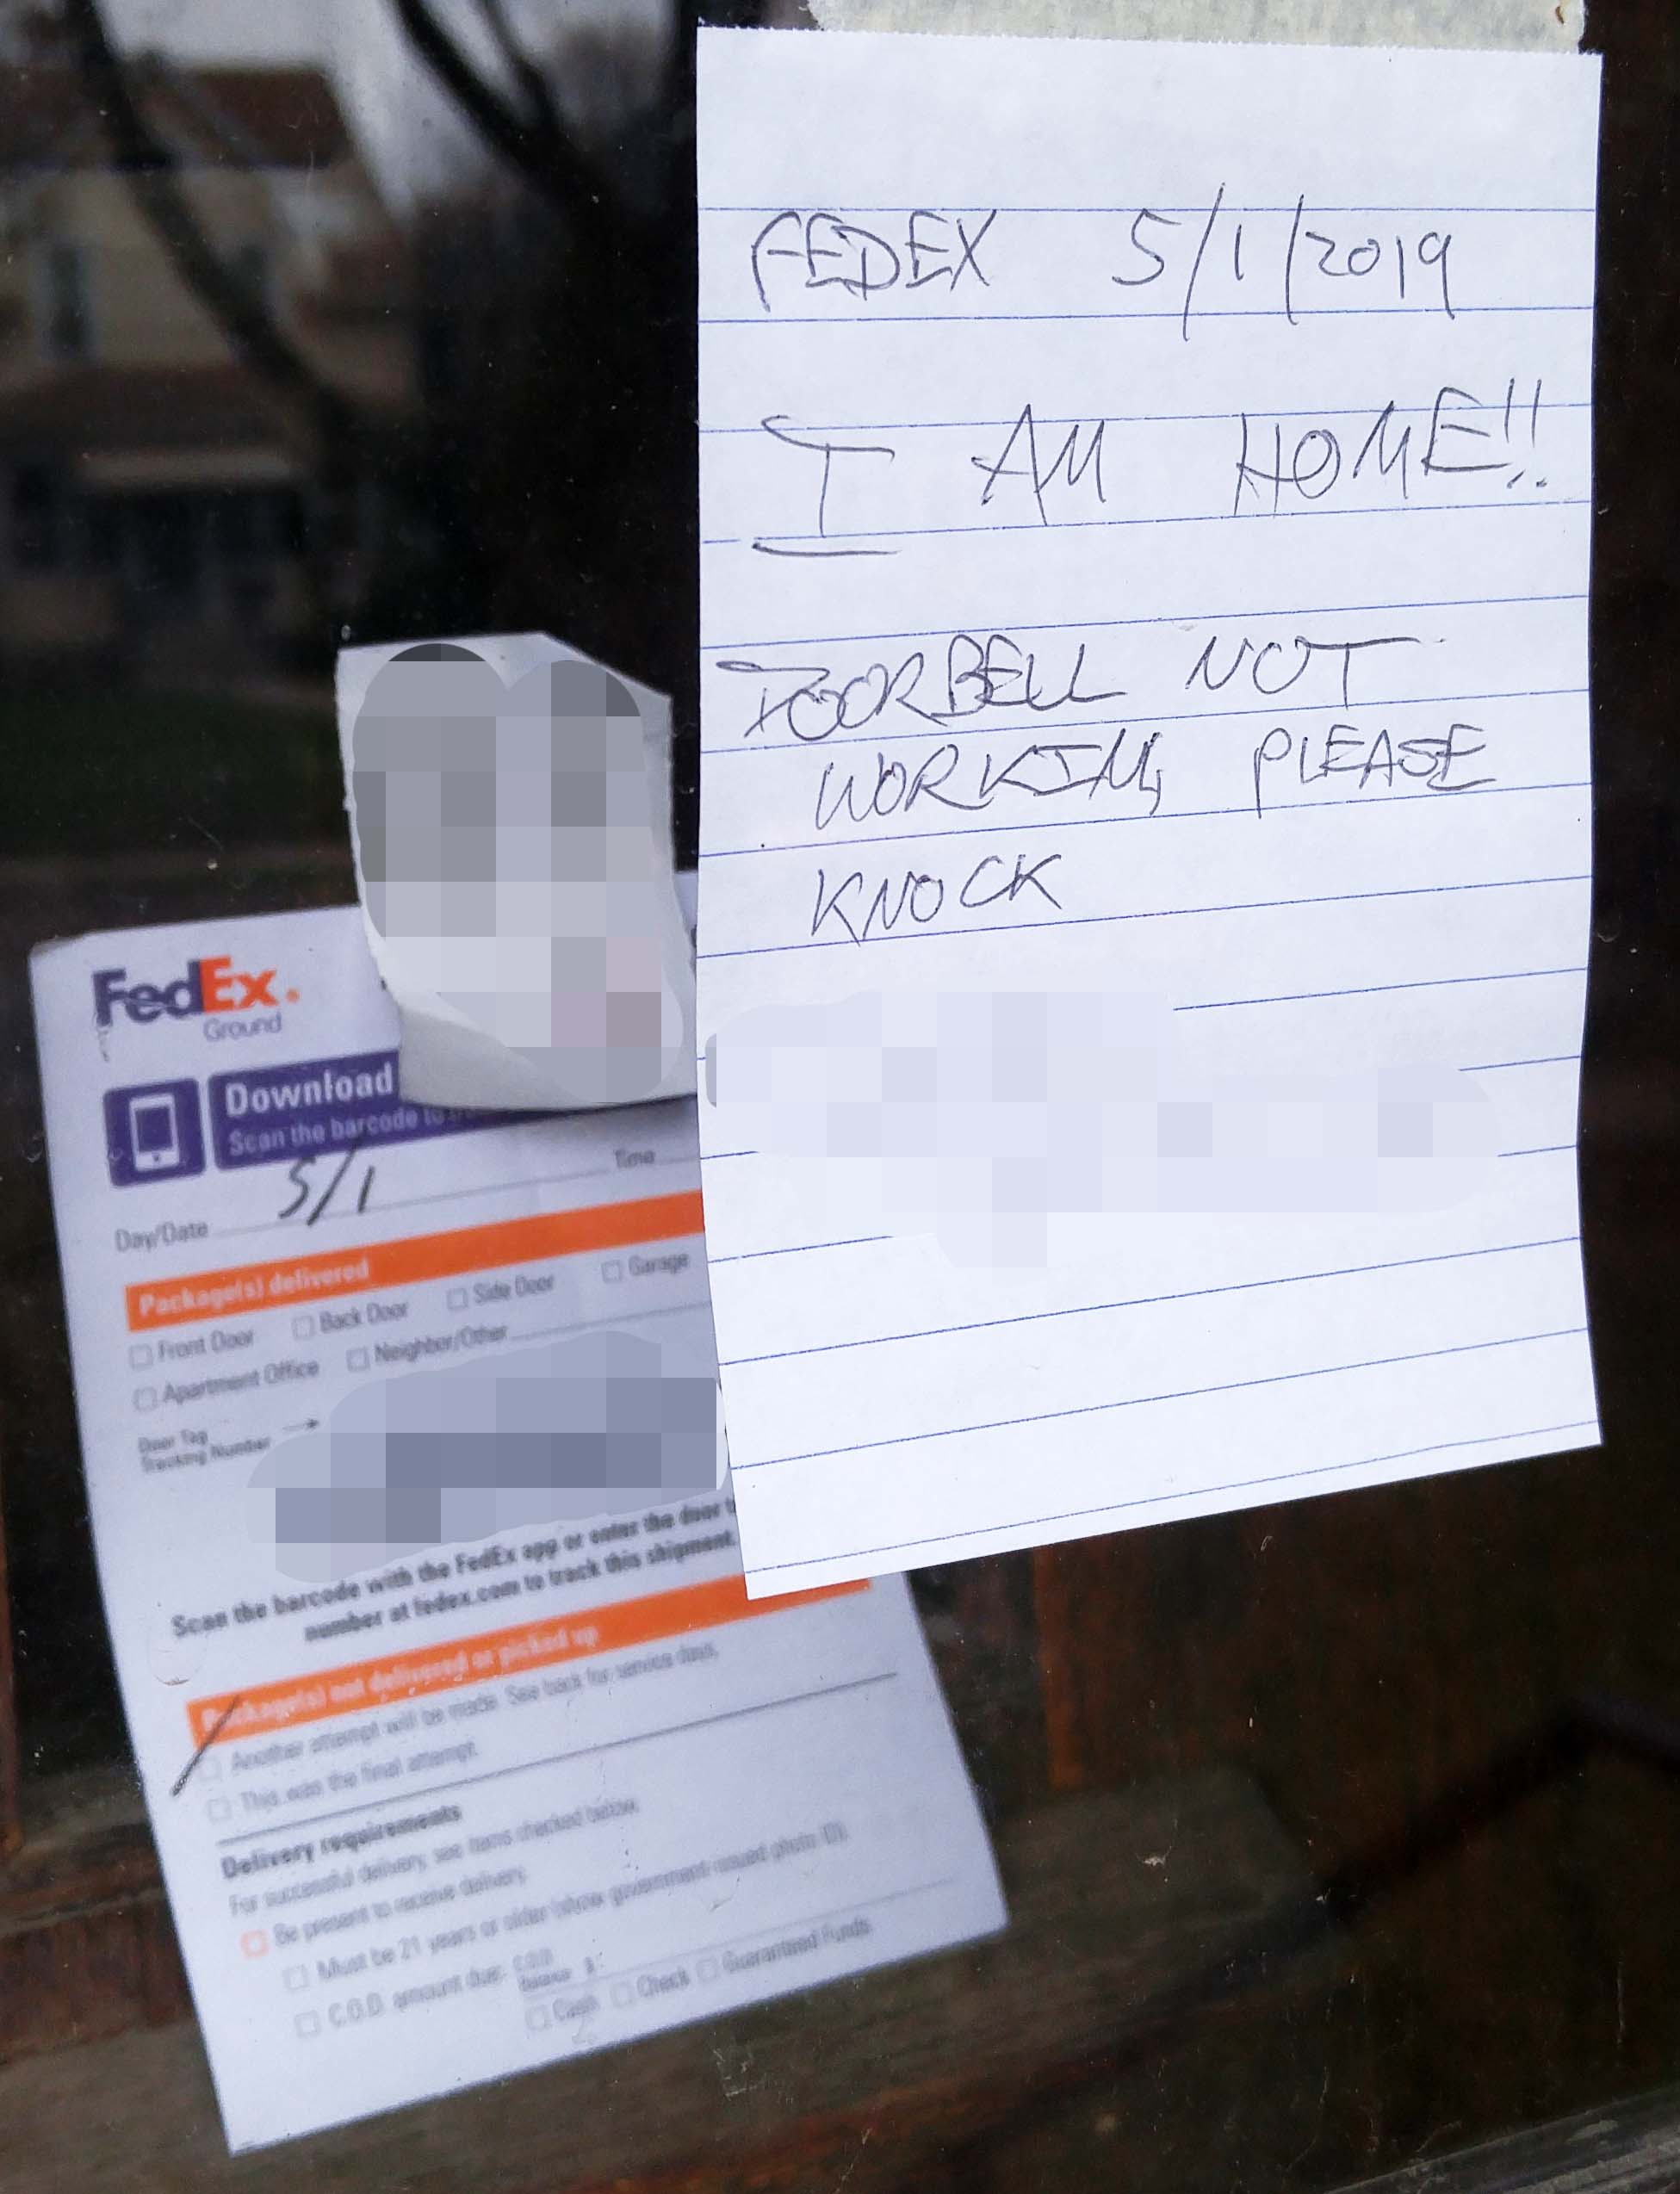
I was worried that the package coming today was marked “signature required” by the sender. I put a note on the door, and made a point of sitting in first-floor space near the front door, so I could hear anybody (usually I can hear car doors closing out on the street; though delivery trucks often don’t ever close the doors so that doesn’t always make noise).
I was right to be worried. I discovered, when the tracking site updated, that they had been here in stealth mode. To add insult to injury they put the “door tag” under my note. At least I’m not in doubt as to whether they saw the note!
No risk they missed my note!
Guy on the phone says there’s nothing he can do (was very apologetic, but completely useless). Using the website I redirected delivery to one of their in-store sites, where they probably can’t make excuses for not delivering. The guy, and the website, couldn’t tell me anything about how to enter a complaint about this situation, so I’m going to be spending some energy today and probably tomorrow on finding ways to do that; way more energy than I wanted to expend on getting a package delivered, but Fedex has gone above and beyond here so I need to also.